Tuesday, March 27, 2018

Rapunzel's Makeover - Hair Repair and New Dress

Rapunzel's Makeover -

Image source: https://i.ytimg.com/vi/teQTjErYeOo/maxresdefault.jpg

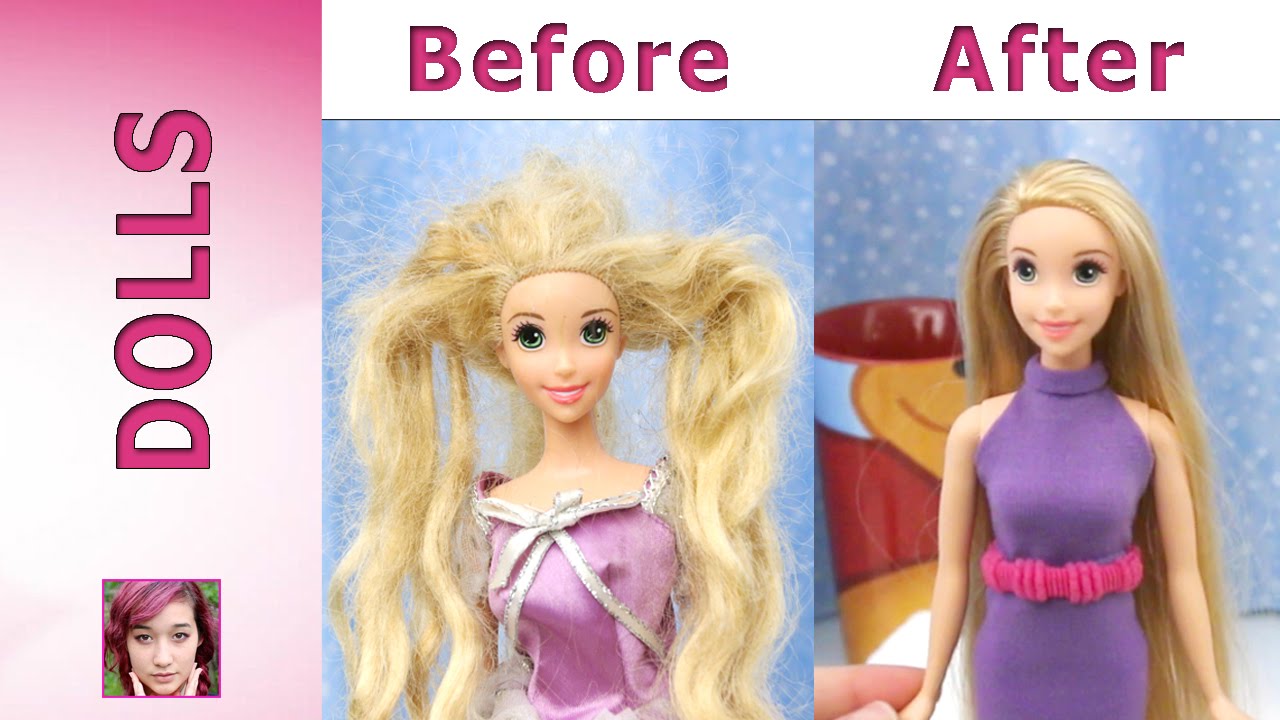
We're going to de-tangle Rapunzel's hair... And transform it from gooey to gorgeous! And we're going to make her a new dress! [Music: Rosie's Tea Party theme song] Rapunzel's hair is a tangled mess! This is no ordinary tangled mess There's glue oozing out of her head It gets all over her hair making a gooey icky sticky mess! This Rapunzel doll belongs to my cousin Rachel and she's here today to help me Say Hi to everyone, Rachel Hi Let's get started We need a spray bottle filled with warm water and one tablespoon of fabric softener and a brush with plastic bristles Spray a section of hair with fabric softener You'll need a lot! Start brushing from the ends up The gooey tangles will be hard to brush so... Spray more fabric softener on them Use as much as you need These are not ordinary tangles You'll end up pulling out some hair... That's to be expected On to the next section Spray lots! You'll need it! The hair closer to the head is the worst! That part has the most glue Next section Spray, spray and...

Spray some more! The tangles are so bad we're going to use a comb This comb is a metal comb It's actually made for dogs It's super strong and great for de-tangling doll hair But you'll still need lots of fabric softener You're doing a great job Rachel! Look at all the hair that got pulled out! Now we're going to wash the fabric softener out We're using Dawn dishwashing soap But any dishwashing soap will work Rub the soap all over the hair Work it in so you get every strand Lather it up! Now we're going to rinse it all off with warm water The next step is to apply Goo Gone on her hair This product takes off gooey sticky stuff like... Makeup from hard surfaces... Stickers from objects... Gum from your shoes and...

Crayon marks off walls This Goo Gone has a danger label Right here. See? Kids should not be using this You'll need an adult to help you with this step There are warnings in the back It says contents harmful! Do not swallow I'm going to put this all over Rapunzel's hair Make sure you cover every strand of hair from top to bottom Work it in so you get every strand Now to wash my hands Dishwashing soap does the job better than hand soap I'll leave the Goo Gone on Rapunzel's hair for 15 to 30 minutes About 20 minutes have passed and now we're going to wash out the Goo Gone Use lots of dishwashing soap! Rub it in and get every strand of hair Rinse it off with warm water Pat her hair dry with a towel Her bathing suit is wet so I'll take it off She's looking good! And her hair feels really clean No sticky gooey feel to it So because of the glue seepage De-tangling and de-frizzing Rapunzel's hair has to be done a little different See her scalp? See those little holes where the hair is coming out of? There's glue inside her head In high temperatures, the glues melts a little and seeps out from the top This is why I didn't give Rapunzel a hot water rinse when I washed her hair I don't want any more glue coming out so... I'm going to keep her head out of the hot water in this step This water is very very hot It's almost at boiling point Put her hair in but keep her head out of the water See? The water is really close to her head Keep her hair in the hot water for 2 to 3 minutes Take her out and put her on a towel Pat her hair dry Stand her up in a tall mug Comb or brush her hair the way you want it to dry Rapunzel's hair is straight with no curls so... We don't have to so anything to it at this point...

Except just comb it straight down If you have dolls that you want to add curls to... Watch my video Barbie Hair Repair The link is in the video description or... You can click on this icard and it will take you to that video We're going to let Rapunzel's hair dry She says... See you later! It's been a couple hours and Rapunzel's hair is dry Look at her hair! Wow! It's beautiful! It's so soft! It's gorgeous! Her hair looks and feels brand new! No tangles.

No more goo! The goo is gone! The Goo Gone worked! We have a surprise for Rapunzel We're going to make her a new dress to go with her new hair! This dress is so easy to make! You'll need a hairband like this They come in all sorts of colours We got these at the dollar store Look at all the colours and patterns Just make sure they are the stretchy kind They're tubed shaped See? Like this! And you'll need some stretchy fabric hair elastics like these We got these at the dollar store We're going to make Rapunzel's dress purple It's her favourite colour I'm going to cut it at the sem Cut both sides of the seam Now it's one long tube. See? The colour of the hairband is dark so... I'm going to show you on a toilet paper roll what I'm going to do So let's pretend this is the purple tube hairband I'm going to flatten it so it'll look like the hairband Now I'm going to open it up and flatten it so... The first fold is now in the middle I'm going to do the same thing to the hairband Open it up and fold in the middle and flatten it Like this.

See? Now I'm going to draw lines on the toilet paper roll to show you where I'm going to cut Draw a line the width of your finger draw a line just past the centre I'll mark the centre for you because you can't really see the centre fold Here it is up close See the centre fold? I'll draw it in more just so you can see That's the centre So I drew this line that's just past the centre Now I'm going to draw another line starting from the centre. See? The line curves and then goes straight. Like this Now I'm going to cut the first line I drew Cut a little past the centre mark. See? Now cut the second line up to the centre It'll look like this.

See? Now I'll cut the top like this so it'll look like this So now that I showed you how to cut on this toilet paper roll I'm going to do the exact same thing to the hairband Draw the first line the width of your finger Just past the centre fold Draw the second line from the centre fold Curve it and go straight Your lines will look like this See? Now cut your lines It's cut just like the toilet paper roll Next cut the top like this I'll cut the length later Now to get this on Rapunzel Pull it right up to her arm pits Hold on to the ends of the top and pull It'll go skinny and curl That's what you want This will be the tie that will go around her neck Pull the dress up so that the tie is right up to her neck Turn her over and tie the tie You don't have to make it a bow but I'm going to Turn her over and tuck in the edges so... You get a smooth finished edge Doesn't she look awesome?! Now for the finishing touch A belt Rachel wants pink Get it on and pull it up to her waist Wow! So pretty! Now I'm going to cut the length I'm going to make a mark where her toes are See the marks? I'm going to pull down her dress a little so we can cut along the marks Rachel is going to cut it Good job Rachel We can fold her dress up to any length we want I'm going to fold it to mid calf length Doesn't Rapunzel look gorgeous in her new dress? And here's a look at the back Save the piece that we cut off It can be used for a top or a skirt I'm going to change the length of the dress to floor length Now the dress is an evening dress I'm going to change the length again! This time shorter I'm going to flip the dress over the top this time Pull it right up to the belt I'm going to use the belt to cover the edge of the dress And voila! Look! A new dress! This dress is like 3 dresses in 1 She's gorgeous! New hair! New dress! Wow! Which dress length is your favourite? Long? Medium? Or short? Post your answer in the comment section below or... Take our poll Just click on the icard in the top right hand corner Whichever dress length you choose, she looks great! And her hair... Remember what her hair looked like? Here's the before photo Ugh! She went from gooey...

To gorgeous! Thanks for watching! If you like this video, click like It looks like this Check out this video Rapunzel is having a fashion show! Here are some of the dresses we made from the hairbands Don't they look gorgeous?! And there's more! Don't forget to subscribe! Thank you!.

Sunday, March 25, 2018

Mango Ice Cream Recipe -- Homemade Ice cream

Mango Ice Cream Recipe -- Homemade Ice cream

Image source: http://www.recipetips.com/images/recipe/dessert/big/orange_sorbet_big.jpg

Namaskar. Welcome to nishamadhulika.Com today we will make Mango Ice cream, which is relished by almost everyone. And it is my most favorite recipe too. So, let's start with making Mango Ice cream instantly.

For making mango ice cream, we have taken 1 kg mango, this is dusseri mango. You can take any mango according to your choice. If there is no thread in the mangoes, then the pulp will turn out to be perfect. If there are threads in the mangoes, even then the pulp will turn out good.

But make sure you strain the pulp through a sieve,  so that it tastes really good. Wash, peel and take out the pulp from the mangoes, Here we have taken 100 gms sugar(1/2 cup ) Mix the mango pulp with sugar and make a fine paste. We have already prepared fine paste from the mangoe pulp. Remove the mango and sugar and place the pulp here, Here we have taken 200 gms fresh cream, You can find packed cream at any dairy.

Place it in the refrigerator i. E cool it. And open the pack later and take it out. Remove the extra milk from it.

This quantituy of milk is drained,  now we whip this cream. We already place these bowls in the freezer, The bowl at the bottom has ice in it, on top of it is an empty bowl, but it is chilled too. Put the cream into it. Whip the cream in a cool room, It is extremely hot these days, If you whip  it in a hot room , then it will be difficult to whip it.

Cream was chilled, the bowl was too, The cream is whipped quickly and is ready, This is very nice and dense cream. We have whipped it for 2 to 2.5 Minutes, cream is whipped and ready. We are making mango ice cream, so we don't need to add any other flavor to it. Mango flavor itself tastes delicious.

Add Mango pulp to the cream, Whip it so that all ingredients mix well.  Cream and mango pulp have mixed well. Ice cream mix is ready, put it in a container to freeze. It is better if we use an air tight container, then there is no crystal formation over the ice cream.

Pour the mixture into the container, Spread it evenly. Close the lid and place it in the freezer, Ice will set and be ready in 7 to 8 hours, after that we serve it. Ice cream is frozen and ready. Now we will serve it, We scoop it out like this.

We can serve the ice cream with dry fruits garnishing, or strawberry sharbat, rose sharbat, or serve it anyway you desire, You don't need to mix anything to the Mango ice cream, this itself is delicious. Making it is very easy, You can prepare Mango ice cream very easily at home. Try making this recipe at your home and share your experiences with nishamadhulika.Com See you soon with another delightful recipe. Do subscribe to my YouTube channel as well..

Wednesday, March 14, 2018

People Try To Cut Their Own Hair Using YouTube Tutorials

People Try To Cut Their Own Hair Using YouTube Tutorials

Image source: https://img.buzzfeed.com/buzzfeed-static/static/2018-02/7/15/asset/buzzfeed-prod-fastlane-01/sub-buzz-30811-1518034352-1.png

- What did you do? - I thought it was gonna be
really easy and it wasn't. Why did it do that? (Electronic music) Today, YouTube is going to teach
us how to cut our own hair. I'm not as nervous as
I probably should be. - I'm scared shitless, so let's see where that goes.

The first 30 minutes, we're gonna be watching a tutorial video. After that, we get 30
minutes to cut our own hair. And then right after, we'll
be going around the office asking people how much they
think our haircut cost. - Wait, you're not
going to take any notes? You're just going by memory? - Oh yeah, of course.

- Do you, I'm not telling
you how to live your life. - None of this is helping me at all. - Are you scrubbing through your tutorial? - Yeah, because I'm impatient, I'm sorry. - Are you ready to cut your hair? - I have no choice, so let's just get this over with, please.

- Let's cut some hair. 30 Minutes starts now. - Now. - This just got so real.

I'm doing my ponytail
at the top of my head. Holy moly. - Oh, shit. I'm going to start with an eight.

Meaning that it's not
going to cut that much. Why did it just go weak? It's literally just vibrating. Ah, thank you. - There you go.

I'm supposed to cut right
above this hair tie. Here goes nothing. It's not going through as
easily as I thought it would. I'm cutting it crooked, what's happening? (Ken gasps) Look at this, that's not how
that was supposed to happen.

- Syd. That's my hair. Okay, remove this and make
it into three sections. Okay.

Fuck, look at this. What am I doing, you guys? (Rock music) So here's the one that I've
like fixed a little bit, versus the one that has not been fixed. And I feel like they look better. (Razor buzzing) - There's no going back now.

Oh, man. - It still looks pretty blunt. I'm going to do what I just did over. How much time do we have? - 17 Minutes.

- 17 Minutes, okay. (Upbeat music) - Going in the back. How do they do this? - It actually, I don't
think it looks that bad. I mean, it gets a little rough over here.

Oh my gosh, wait. Oh my gosh wait, look at this. I don't know how to fix this. - Oh, Jesus.

- Now I'm straying from the tutorial. I'm just going by memory. The last time I got my haircut in August. I'm just trying to remember
what my hairstylist does.

But I don't think she's ever
fucked up my hair this bad. She definitely hasn't,
she's wonderful at her job. - We have 12 minutes You know what, fuck it. I'll just have to go to this
side because this looks...

Oh man, I fucked up so bad. - Was my hair this long when we started? Yeah, okay so it looks
like I only cut this much and this stuff right
here is just hanging out. - I think I feel a lot more
confident on this side. I think it's going to look
way better on the right side.

Oh yeah, okay. Now I'm getting the hang of this. - Well, I'm not. I'm just gonna, there goes my hair.

It's on the ground now. - I think I should just
give up on my back. - This is not what this is
supposed to look like you guys. I know what a haircut's
supposed to look like, and this isn't it.

Okay well, I think I give up now, so. - Well, I can't really give up because at least I want to look
decent when I come out here. - Maybe it's something where
our coworkers will not know. - No.

(Laughs) Please be merciful. - Hey, the alarm's going off. (Ken groans) (Ken laughs) - I mean, it's not like totally even, but I don't think it looks as bad as you think it does. - Compare this side.

- Okay. - To this side. - That side looks much better. - Well, here's my hair.

- Honestly, if I look from far away, oh, wait. (Laughing) - Before we've asked
anybody their opinions, would you do this again? - Definitely not. - I absolutely would not. - I think I've learned my lesson.

- I've learned my lesson. But, I don't know. I'm excited to see what
our coworkers have to say. - I'm not (laughing).

- How much do I think you
paid for your haircut? 70 Dollars? - I cut it myself. - (Laughing) What? Okay, now that you point it
out, yeah, it's a little blunt. It's a little blunt. (Laughing) Oh that's fucked up.

- It definitely smells
like it was blow dried, so I think you got it done. - That's just your regular hair smell? Damn, you have nice-smelling
hair. (Laughing) - Okay, it smells like you just showered. - Okay, I think they're low-end haircuts.

- Are they the same or different? I think you did them yourselves. - [Ken] We did. - I know, I can tell. (All laughing) - The only reason is that
there's one little part that's like not fully blended.

- A little uneven in the back. Yours looks great. But also a little uneven. Did you like do these to each other? - [Sydnee] We did them to ourselves.

- To yourselves? That's impressive. Like, honestly, wow. Yeah, they definitely don't
look like expensive haircuts. (Upbeat music).

Make Your Own Ice Cream! - #sciencegoals

Make Your Own Ice Cream! - #sciencegoals

Image source: https://hungryhappenings.com/wp-content/uploads/2015/06/Polar-bear-ice-cream-cone1.jpg

Woo! Its getting hot out! Squeaks and I are craving ice cream, but we
dont have any. So, were going to make ice cream using
science! We know that ice cream is made out of cream
and sugar and a flavor. And we know that its frozen, but its
not rock hard like plain ice. Its more like very cold whipped cream! So, we have cream and sugar.

We also have vanilla that well flavor our
ice cream with. And now were going to take these three
ingredients and turn them into ice cream! And you can do this at home, too. Youll need your three ingredients: sugar,
vanilla, and cream. Or you can use milk or half and half instead
of cream.

Youll also need a measuring cup, measuring
spoons, oven mitts or a towel, a small sealable plastic bag, a large sealable plastic bag,
ice cubes, a timer, and a grownup to help. The last thing youll need is the important
one: salt! First, take your three ingredients and put
them into the smaller bag. Were using a half cup of cream, a half
teaspoon of vanilla, and a tablespoon of sugar. And then, seal up that bag.

Next, put ice into the big bag. Were putting four cups of ice in. Thatll make the cream cold. But, heres the amazing scientific part! Were going to add salt to the ice.

Were adding half a cup of salt. Its important to add salt to the ice, because
that will make the ice cream freeze much faster. Heres why: If youve ever put out salt on your sidewalk
or driveway in the winter, you know that salt can melt snow. Thats because when theres lots of salt
in water, it needs to be colder than plain water does to freeze.

Even if its cold enough outside for /plain/
water to freeze into snow, its probably not cold enough for /salty/ water to freeze! So when you add salt, the salty snow melts. When you add salt to the bag of ice, the same
thing happens. The ice is cold enough to freeze when its
just plain water. But its not cold enough to freeze when
theres lots of salt! So the ice cubes in the bag start to melt! That melting is /really/ important for making
your ice cream really cold, really fast.

Because as the ice melts, it draws in heat,
making the things around it much colder  including your ice cream! So, now that weve added salt to our bag
of ice cubes, the ice is going to start to melt and make the cream, sugar, and vanilla
in the smaller bag REALLY cold. While thats happening, were going to
make sure the ingredients in the bag become ice cream! This is where we need our oven mitts or a
towel because this bag is really cold. Protect your hands and hold onto the bag. Now were going to shake it! Its good to have a friend to help you with
this part.

Squeaks and I have made butter before, and
we shook up the cream until it got hard and turned into butter. But before it turned into butter, it was soft
and fluffy whipped cream. Ice cream is harder than whipped cream, but
softer than butter, so well have to shake our cream /longer/ than we would to make whipped
cream, but /not/ as long as we would to make butter. There are tiny pieces of fat in the cream,
and as we shake the bag, theyll start to clump together until the mixture becomes thick
and creamy, just like ice cream should be.

If our salt water solution is as cold as if
feels, that should take about five to ten minutes. Ready, Squeaks? Its getting there! It looks like whipped cream now. Just a little bit longer. Its looking a lot more like ice cream to
me.

Lets open it and check. Make sure you have a spoon handy to taste
test! What do you think, Squeaks? Tastes good to me! We did it! And we hope your science ice cream is delicious
too! Make sure to ask a grown up help you with
your experiments and share your results! Squeaks and I want to thank our friends at
Google Making Science who helped us with this experiment. Let us know how your ice cream turns out by
emailing us at kids@scishow.Com Thanks and well see you next time here
at the Fort!.

Friday, March 2, 2018

KICKING A BALL TO MAKE ICE-CREAM!

KICKING A BALL TO MAKE ICE-CREAM!

Image source: http://kellyloves.files.wordpress.com/2010/04/img_8971.jpg

(Gasping) Whoooa! (Intro music plays) Ahhh! Good day everyone and welcome to today's very exciting video where we are going to be making, Ice freaking cream! From this weird contraption thing uhhh so.. I'm very excited about this, it's been awhile since I've done a vlog so I figured I would make it into like a vlog/creative video uhm soo.. Yeah! We're going to be making some freakin' Cotton Candy flavored Ice cream in this kickball type thing I saw this online and I thought it was absolutely freakin' amazing! Basically it's a manual way of making ice cream, you have two sides of this kickball type thing (taps the kickball) This is where you'll be making the ice cream and the other side.. Here! Let me put this down it's so insane, the future is here everyone! Uhhhhm..

Okay! Let's put you down on this little box.. Okay, (laughter) I'm still cut off I need to set you guys up higher this reminds me of.. My old videos just like trying to make things t'werk okay there we go Alright! So there is this side which we are gonna put the ingredients into and then the other side we are going to.. (Scoffs) break a nail trying to open it by the way..

I need to get these nails done soo bad Look at how grown out these nails are! They need to be re-did so badly.. Okay so anyways okay so we have to put ice and salt in this side which.. Salt added to ice just pretty much lowers the temperature sooo it can get freezing cold and then the other side it's pretty simple actually I'm just gonna use some coconut milk some stevia to add some sweetness to it and then I'm gonna do- (whispering something I couldn't hear sorry!) Gonna add some cotton can- did I say bubblegum before? I don't remember, but we're making cotton candy flavored icecream so I'm gonna add a little bit of this flavoring.. Look at it gorgeous! And than I'm gonna add some pink food colouring just to make it cotton candy-yy Sooo.

Without further damn a doo let's get to making! (Sighs) so first things first I say we add the icicles in so I'm just gonna pop open my freezer I have aaalot of freakin' stuff in there.. Uhm let me know if you guys ever want me to do like a 'what's in my fridge video' in cause you were wondering what's in there I can show you I have alot of ice in here.. Okay so let me see ohh!.. Boys I got you an ice cube Daniel took the dogs for a hike today annnd they're very exhausted but they are gonna help me make the ice cream aren't you boys?! Okay this is taking so long! How much freakin' ice can you put in there?? Alright you know what..

This calls for bringing it over! (Loud ice noises intensify) (Laughter) woooow that's alot of ice! Okay, (ice noises) I was gonna pour it in but the opening is very small Okay so I'm gonna start adding some salt just so I don't just put- my hair is wild right now! Okay so I'm just gonna pour some in around the sides.. Really lowering this temperature now I'm gonna add more ice I'm just gonna speed through this and I'll be back once I'm done adding ice (Cheerful music plays) okay so this is pretty much what it looks like there's so much salt in here annd there is a ton of ice so I'm just going to.. Plop this on hold up.. How do you do this? Storm are you enjoying those ice cubes? Quick get them before they melt! Okay..

How do i do this?! This is not that difficult but I've made it very challenging.. Okay it closes this way alright and then you just.. (Snap) push down on the hatch and that's pretty much it for that side soo now it's- Oh my god it's got (ice noises again) real heavy uhm so now I get to add the ingredients annd I need a measuring cup.. But basically you have to do a pint liquid which I didn't know what that was so I looked it up and that is two cups! I believe...

I hope so mkay well let me go get a measuring cup ohkay come on Ms. Coconut milk.. I'm gonna pour you in and you're gonna become ice cream (Joey sounds) okay I'm just really confused because there is so much space in here but it's acting like there's you can only put two cups sooo.. I think I should add moore? I'm just gonna pour my own amount in right now that seems about good, hopefully I don't overdo it okay so that is in now let's add some food colouring this is also really hard to do with one hand let's add some pink in here oooho yess..

(Squeeze the darlin?) Okay we got the pink now let's add a little bit of the stevia.. I need to put you guys down so I can get- actually I'll just pour it in alittle I actually don't know how much stevia you're supposed to put in.. It looks so pretty this is what stevia freakin' looks like.. Mm okay I'm just gonna do a little bit I don't want to overdo it..

Now I'm just gonna mix it up and we're gonna see it turn.. Pink! It's already starting to freeze I think? Oho. Just kidding no it's not okay.. Woooow! Oh that's really pink that's a real pink ice cream okay last but certainly not least it's time for the cotton candy..

Uh I'm just gonna pour I don't even know how much I'm supposed to put in of this.. Probably just a little teeny-tiny cuz I feel like a little goes a long way yeah I just poured a little in.. Now let's put the cap on and then let's roll this bad boy around!! Oh I'm excited! Okay it's all in here and I'm actually extremely nervous that it's going to spill out everywhere but it's all attached on pretty tightly so let's just drop it down.. Okay boys! (Laughter) Let's play kickball! Wooow! Look at it go! Wolf! Storm! Come get this come on I need help! Go get it!..

Get it boys get it go on! This is going to be a long loong night I think you can like play like soccer with this.. I don't have shoes on let me get shoes on then I'll see how hard I can kick it Okay I got shoes on.. Oh wait is it already starting to come out a little? I feel like it's leaking a little bit I dunno Oh my gosh.. Yeah! There's some water coming out..

Okay soo there is already a defect in this but this is pretty fun.. Playing soccer (Cheerful music and Joey noises) now he likes it because it's leaking uhm I defiantly put it on as tight as it can go but it is leaking a little bit which is a little annoying and the.. The ice is licking too a licking.. Melting uhm so I think I'm just gonna shake it over the sink for a little bit and I guess we'll see if it actually turned into ice cream (sigh) I'm already exhausted from just doing that alllright so it has been about thirty-minutes and I kind of want to check in and perhaps it's ready soo uh I'm going to try and open this oh..

Oh my gosh this is so hard! (Joey noise) okay (laughter) it's extremely hard to open alright moment of truth oooooh whoooa! Okay hold on let me change the angle okay so this is what it's looking like.. Wooow okay so I guess there's still a little bit of coconut milk at the bottom which is fine because I feel like it all went around on the sides.. Soo let's scoop on into it and see how it is! Oh my gosh its so.. Oh my gosh it's actually like really firm..

What the heck this is hard (laughter) this is hard to do oh my gosh.. Why is it so solid? This is not what ice cream is supposed to be is it because I used coconut milk? Okay I defiantly thought it was going to be easy and it really hard to make it solid but it's the exact opposite it's extremely solid it's so cold.. Holy crap! Like i've been chopping away at it but it doesn't seem to wanna.. Like be scooped Well I'm going to let this defrost a little and then we will try it out Okay so what I ended up doing is emptying out the ice and adding in hot water and now it's like really melty..

Soo maybe don't do that uhm but.. Just to show you guys kind of what it's looking like now uhm there is.. It's finally crumbling around the sides so we can do a taste test now and the bottom is leaking so hard okay yep it's really melty now gimme a chunk!! Care for some ice cream? (Laughter) okay let's just try this actual ice cube of pinkness mkay.. Okay yeah it kinda taste like a Popsicle actually it's like a coconutty/cotton candy..

It's really yummy! It has the texture of a Popsicle I dunno where I went wrong I think it's the coconut milk but it's still really good and.. (Laughter) this is what we ended up with.. This.. Ice cream frozen soup it's yummy though! It's delicious who waants some? Boooys! Wolf's like "is it food can I eat it real nice and good like?" Uhm okay well I guess that's that if you enjoyed this video Please give it a big ol' thumbs up! I'm actually going to give away one of these so if you want to win one all you have to do is be one of my subscribers, leave a comment down below letting me know you want one of these and also give this video a thumbs up- (gasp) it spilled! Okay I have to go! I love you I'll see you all tomorrow Good day and byyyye! (Outro music).

Wednesday, February 28, 2018

Mens HairWhy & How to Use a Blow DryerHair Dryer - Mens Hairstyling Tips

Hey guys real quick before the video starts I just want to say that I filmed this video over the course of two days yesterday [I] had long hair on my sides. [I] filmed a bit then I got a haircut and then today. I filmed all the cutaways [so] that's why I have two different lengths of [hair] in this video also I've got very chapped lips at the moment, so let's go ahead and start the real video. Yeah Hey, what's up guys? My name is [Jill] and today's hairstyle has been Made using completely original as a pre styler and a post Styler before I got the product in I was running out of my little sample jar So I've been practicing cocktailing using original as a pre styler and something else [is] a post dialer but today 100% [original] Hashtag good product Hashtag wink wink Hashtag go get some hashtag.

This is [jo] marketing in case you haven't figured it out anyways on to the actual video for today. Why? How should you use a blow dryer [so] as per usUal when I do videos like this I like to start out with the basics That's what I'm Gonna Do now and will progress a bit more get a bit more detailed as we get later on in the video So let's go ahead and start out with why why I use a blow dryer Do reasons first reason is because a blow dryer allows you to use less product to finish off your style After you finish blow-drying and this is a good thing because since this allows you to use less product You're not going to weigh down your hair by adding too much which could result in hair flop Later on in the day a little bit of product and a blow dryer should result in a hair style lasting a lot longer So the second reason a blow dryer almost always enhances any kind of style that you're trying to go for in terms of [hairstyles] though If you're going for a quiff or a slicked back or even a fringe hairstyle You know facing down using a blow dryer is going to help enhance that style and make it easier to work [with]? When you're applying product, I'll go ahead and show you two examples for this first example I'm styling my hair without a blow dryer My hair is clean and dry and I'm going to be applying original by bloom on straight into it and attempt to get it into the style that I normally have There's two problems with this first since my hair is not already dried into that position I want [its] a lot more effort to make it. Go that way [the] second problem I have to apply more product than usual. Which in turn makes it look less natural Which brings me to my second example now? I'll be using a blow dryer going for the exact same look After blow-drying it into the desired direction, not only is it much easier to apply [products] But I'm also able to use less and get a more natural-looking hairstyle It looks better Basically all in all now I understand that there's exceptions to the rule and not everyone is going to need a blow dryer So if you're one of those people don't get mad at me I know that you exist my point was to basically show you how a blow dryer can enhance your style If you use it correctly [okay], so that brings us to the next section How should we use a blow dryer? This obviously comes down to your hair type and the type of style that you're wanting to go for however There are a few tips that can be applied to everyone using a blow dryer So that's what I'll go through now first up the damp of your hair is before you start The better the style will look once you're finished blow-drying I'm not saying that you need to blow-dry [your] hair while it's soaking wet, but basically the damper It is the more it will listen once it's dry this is simply because the dryer that your hair is the more trying to fall into its natural state in terms of Texture the way it grows those kind of things But if you blow dry it when it's wet you're not giving your hair the opportunity to fall into its natural position Thus Allowing you to blow dry in the direction that you want to you get it basically if you blow dry when it's really wet it Can't really fight against you if that makes sense secondly the more heat that you use when you blow dry Again the more your hair will [to] you basically hot air loosens up your hair follicles and makes it So that they are more prone to listening to what you're trying to tell them to do when you're blow-drying them into a specific direction people often ask me if it's okay to use the hottest setting on your blow dryer and My answer is it depends on how healthy your hair is if you take care of your hair generally and you feel like it's pretty Healthy [I] said go for it use the hottest heat however if your hair is more on the drier side Then I've suggested using the medium heat setting not on full blast [heat] and of course I'll always recommend using a heat protectant before you blow dry to add some extra protection to your hair and in case you forgot Original by Bloomin has heat protectant element built into it as well as pre styling Capability as well as post styling and capability so just as everything finally when your hair is completely dry or at least almost completely dry switch over from the hot setting on your blow dryer to the complete coldest setting and Continue blow-drying your hair in the same direction as you've been doing just as hot air Opens up the hair follicles cold Air Closes them back down and locks them into position by blasting your hairstyle with cold air is going to help make that style last longer as well and also when you're [blow-drying] with cold air you can hold the blow-dryer closer to your hair because that's going to give a Greater Impact, but it's not going to damage your hair at all [alright].

Good job everyone for listening so far I've just got [one] more [thing] to talk about and this is hair styling tools like in addition to a blow dryer I'm going to be showing you how styling tools can make a big difference on your final outcome first I'll be using this paddle brush to go for a side-swept look without too much volume I'm simply blow-drying my hair in the same direction the entire time to get it to set straighter One last coating the product to set it all together and boom Shacka Lacka the first dial is done son I know you like buns, son [chat] [how] [does] the song go [and] for the second style again starting with Damp hair and original as a pre styler? [I'm] going for much more volume I'm using a round brush this time to curl my hair and an upwards position and to build in some crazy height I've gone through this quickly because I'll probably be making a more [in] [depth] hairstyle later on using this technique But as you can tell it's super different to the first style [branded] there might be a bit too much volume going on But the point was to make a difference from the first hairstyle and des what I did one more application of original because well I like showing it off and there you go Alright guys and this concludes this week's video If you've got any more questions Regarding blow-dryer styles in General make sure you check out the bloom on community group on Facebook. That group is fire I'm telling you. I've never seen such an active group in my entire life granted. I haven't really looked around for any other ones because It's such a great group Don't need to look for any others you can find that link in the description along with my Instagram Twitter and Facebook all that good stuff along with community Social media as well, it's all down there [thank] you guys for watching And I'll see everyone next [time].

Monday, February 19, 2018

How to Turn Milk Into Whipped Cream - Gemma's Bold Baking Basics Ep16

How to Turn

Image source: http://www.wpclipart.com/dl.php?img=/travel/the_road/passing_zone_w_cars.png

Hi Bold Bakers! One of the biggest queries on Bigger Bolder
Baking is whipping cream. In a lot of countries out there, you dont
have cream that whips up well. But the second best thing I can do for you
if you dont have cream that whips up, is to make substitute cream out of milk. I was inspired by another YouTuber, called
the Simple Cooking Channel.

He had done it and had great success, so Im
going to show you how to make it also. In a small bowl, youre gonna add in some
milk. So for this recipe, if youre vegan or dairy-free,
feel free to use any kind of dairy-free milk. Itll actually work really well too.

To the milk, Im going to scatter over some
powdered gelatin. Then just stir it in with a fork. Now you can also use agar agar, which is a
vegetarian version, and that will work really well too. Same amount, same everything, but just make
sure the agar agar is powdered.

So you just want to let this sit on the counter
for around 5-10 minutes. Youll notice it forms a sponge, and then
well come back to it. After 5 minutes or so, your gelatin should
look like this: nice and firm, and spongy. So now our next step is to pop this into the
microwave, or you can do it in a bain-marie, and you just want to gently melt this jelly
until its liquid.

So after just 30 seconds, our gelatin mix
is nice and melted. It is liquid-y, there are no gelatin lumps
or bumps, this is what were looking for. So we are going to set this aside, let it
cool down for a minute, and get started on our next step. Into a large bowl, add in some cold, full-fat
milk.

Now remember you can do this with any dairy-free
milk as well. The gelatin mix has cooled down a little bit
so Im going to pour that in there. Give it a whisk around. So liquid whips up so much better when its
cold, so were going to pop this into the fridge, for five minutes or so, to take the
chill off it, and then we can whip it.

Our cream mix has been in the fridge for five
minutes or so, and you can see its starting to thicken up. So this is the part where we turn it into
whipped cream. Now to give it a little bit more flavor, because
right now, all it tastes like is set milk, were going to add in a little bit of icing
sugar. You can also add in vanilla extract if youd
like, but thats up to you.

Now, using an electric mixeror you can
do it by hand, you just need a lot of elbow greasewe are going to beat it up until
its nice and thick. You can see already that its starting to
thicken up, and the volume is getting bigger. You can see the whipped cream changing, so
keep on whipping until it gets nice and thick. It does take a few minutes.

So this whipped cream recipe is for the people
who cant buy whipping cream in their country. This is a good substitute for that. Also, just a reminder, this can be used as
serving cream, it can be used in mousses, or any of my cheesecakes, but it cant be
used in my ice cream. It has grown around three times the size.

As you can see, it has that lovely texture,
just like whipped cream. This is what were looking for. You can store this whipped cream in your fridge,
and it will happily live there for up to 2 days. Because of the gelatin, if it does set, then
just mix it back up together, and make it light and fluffy.

A lot of you already know that I have lots
more Bold Baking Basics recipes, just like this one that will change the way you bake
in the kitchen, so make sure you check them out!.